
Candles with dripping wax create a spooky ambiance and that’s why people use candles for Halloween decorations. And, in this spooky season, melting candles can be a great subject.
So, I have come up with an easy step-by-step drawing tutorial for melting candles. By following these simple and manageable steps, you will be able to learn melting candle drawing easily. Grab your drawing supplies now, and start practicing!
What I am Using for this Drawing
Pencil: 4B or 6B
Paper: 320 GSM
Eraser: High Quality
Outliner: Black Marker
Coloring Tools: Watercolor Markers
How to Draw a Melting Candle Step by Step
Step 1: Draw the Candle Stick

For drawing a melting candle as your Halloween project, you have to gather all the necessary supplies first. Now, you have to draw the candle stick made of wax. For this, draw a regular rectangle with a rounded bottom.
I have used my favorite 4B pencil and 320 gsm paper. You can use your own favorite supplies.
Step 2: Draw the Melting Wax

Melting wax is the main feature of this Halloween drawing project. So, draw an irregular closed curve line over the top side of the rectangle. It will be the melting wax of the candle.
Step 3: Make the Wax Visible

Now, you have to make the melting wax visible. For this, use a high-quality eraser and cleanly erase all the unwanted lines inside the rectangle.
You will see that a proper melting wax has been created on the top side of the candle stick.
Step 4: Draw the Candle Wick
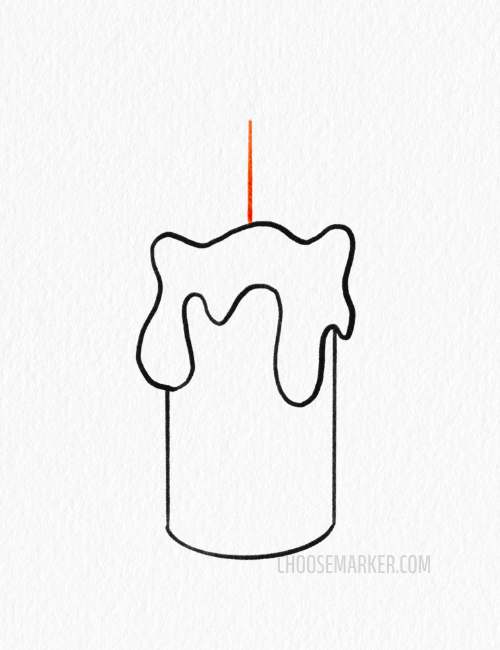
At this stage, you have to draw a candle wick which is made of yarn. Usually, this wick lies on top of the candle. So, you have to also draw it on the top side of the candle stick.
You just need to draw a small straight line on the top side of the candlestick to create the yarn wick.
Step 5: Draw the Burning Flame

This is the main part of a candle which is the burning flame. Follow the reference carefully and draw two curved lines from each side of the wick.
Join the two curves at the top side and you will see that a burning flame has been created.
Color the Melting Candle Drawing

Finally, color your melting wax candle and bring life into it. I have used basic three colors in it which are – yellow for the flame, white for the melting wax, and light purple for the candle stick.
As the coloring tools, I have used watercolor markers. You can go for your own coloring supplies and shades. Always try to play with colors and explore something new.
Some Easy Melting Candle Drawing Ideas
If you are looking for a melting wax candle drawing, then this is one of the best options.

This melting wax candle drawing is for those who are looking for a candle with extra melted wax on its body. If you are among them, try this one!

If you dreamt of drawing a melted candle that becomes short after burning for a long time, you can try it!

Wrap Up
Melting wax candle is one of the eye-catching features of spooky season as it’s a part of Halloween decoration. So, you can follow this step-by-step melting candle drawing tutorial and try it for your Halloween drawing projects.