
We all know tulips, those beautiful flowers that spread their petals to the world in springtime. It’s no wonder it has become a signature of Holland and is the perfect subject for drawing tutorials! This step-by-step guide is for you if you’ve ever wanted to draw your own tulip flower masterpiece!
Drawing a tulip is easy when you know how. In this beginner tutorial, I will show you How to Draw a Tulip Flower step-by-step. I’ll break it down into six steps that even a beginner can understand.
Grab your pen and paper, and learn how to draw a tulip flower! I’ll help you create an amazing tulip flower in your sketchbook with just a few simple steps. So, follow along step by step, and you’ll soon be drawing gorgeous tulips in no time.
Supplies You Will Need
Pencil: 4B or 6B
Paper: 300 GSM
Eraser: High Quality
Outliner: Black Marker
Coloring Tools: Watercolor Markers
How to Draw a Tulip Flower Step-by-Step
Now that you have all the necessary supplies let’s get started! Follow along as I guide you through each step and show you how to draw a tulip flower step-by-step.
Step-1: Draw the Flower Body

The first step of the drawing process is to create a basic flower outline using construction shapes. You can use any shape—from simple circles and ovals to more complex polygons. However, at first, I will draw an oval for the easy tulip drawing.
Step 2: Create the Petal Form

Here, draw another overlapping oval — slightly larger than the previous one. These will form the base of the flower, mainly the petals.
Step 3: Draw Back Petals and Stem

Next, add another small petal above the previous ones. Now, add a stem-like shape from underneath the flower to give it some structure.
Step 4: Draw the Leaves

At this stage, draw the leaf of the tulip. It can be done by drawing a curved line or several small curved lines to make the leaf more realistic. I have made two leaves on both sides of the stem using curved lines.
Step 5: Add Flower Details

Refine your tulip flower drawing by making necessary tweaks and adjustments. Make sure all the construction shapes are connected properly and create an overall pleasing look. Don’t forget to add details, such as veins in the petals and leaves.
Color the Tulip Flower Drawing
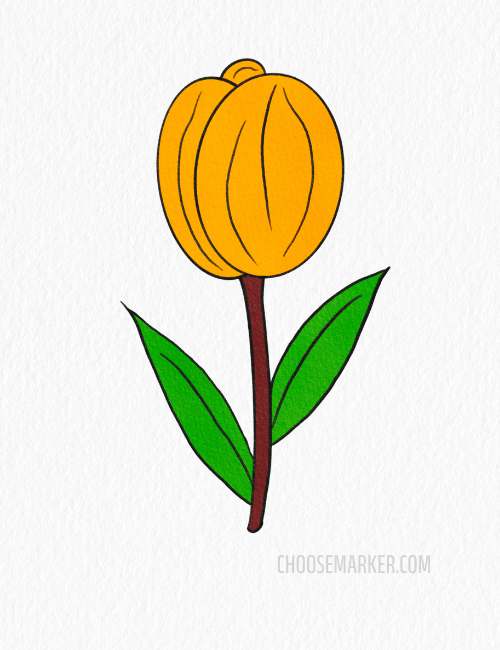
The last step is to add color to your tulip drawing. Depending on what kind of tulip you draw, the colors can vary from bright reds, yellows, and oranges to more subtle pinks and purples.
Use an assortment of shades to create the desired effect, and you are done!
Some Tulip Flower Drawing Ideas
Drawing a Single Tulip Flower

Drawing this single tulip flower will be fun as it’s really easy. You can try this one if you are looking for easy tulip flower drawing ideas!
Drawing a Pair of Tulip

How about creating a beautiful pair of tulips growing side by side? Draw two separate tulips, with one on the left and one on the right.
Drawing a Blooming Tulip Bunch

Who doesn’t love to have a gift of tulips in the form of a bouquet? How about drawing a bunch of blooming tulips?
Sum It Up
Congratulations, you have just completed your beautiful drawing of a tulip flower. I hope this beginner-friendly tutorial was easy to follow and that you now feel more confident in drawing flowers.
Keep practicing, and soon enough, you will be creating stunning flower illustrations with ease!
No matter what type of tulip art you want to create, these beginner drawing tutorials will help guide you through the process. Follow along and have fun as you learn how to draw a tulip flower!
Happy drawing!
Good luck!