
Gel pens came into the limelight based on their writing ease and smoother ink flow. They are a kind of revelation for scrapbooks, and most will agree.
Of course, gel pens do not come on the cheap, and it can be heartbreaking when they stop working abruptly. They use water-based ink, which can sometimes get clogged or dry out, especially when you don’t use them for long.
But the good news is that there are ways that you can fix it and enjoy its efficiency for a little bit longer. In the following, I detail a few steps on how to revive gel pens.
Important ✓
Gel pens respond well to different types of pressure, and they can resist drying out for some time. But that does not mean they cannot malfunction. Gel pens sometimes dry out, especially if you forget to replace the cap and place them with the tip facing downwards.
You can try a simple hack like the below tips to revive gel pens, and you may not need to throw it away. Don’t be too eager to pull the spending trigger just yet. Keep in mind that not all gel pens can be saved, but it doesn’t hurt to try.
Things You’ll Need
Fixing a dried-out pen with a few things that you can get around your home such as.
- A glass of water/ A water dropper
- Damp cloth
- Magnifying glass
- Small pliers
- Warm water/ Kettle
- Scratch paper
- Craft heat gun/ blow dryer
- Solvents
Follow These Steps to Revive Gel Pens
First Step: The first step is to shake the pen so that you can try and dislodge any materials or air bubbles stuck in there. Sometimes, the problem may only be an air bubble or space inside the pen nib. Try writing circles on a piece of paper, and if it doesn’t work, move to the next step.
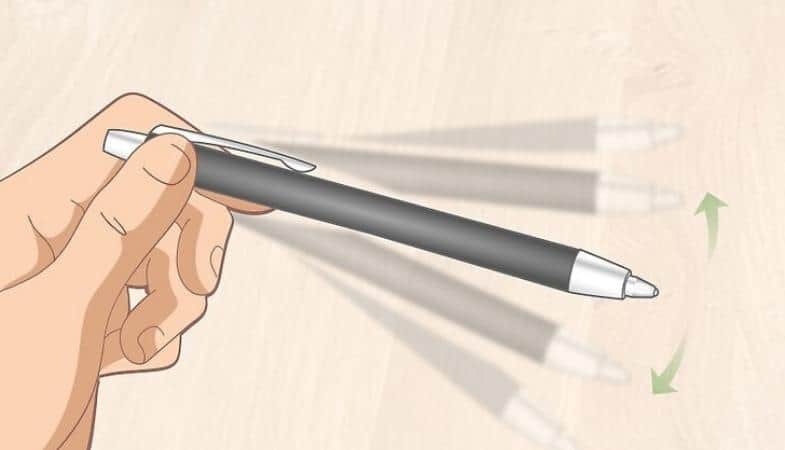
Hold the gel pen on the opposite side of the tip, and give it a few shakes, just like you would with an old-fashioned mercury thermometer. Try a few scribbles and see whether it is going to work.
You can also use a damp cloth or magnifying glass to inspect and clean out any dried ink on the pen nib.
Second Step: Unscrew the top of the pen with small pliers. Inside the protective casing, you will find an ink cartridge. Pull it out and add two drops of water, and blow air into it. Shake the gel pen and try writing on a piece of paper.

You can as well press the tip on the scratch paper to further clean it. If it is still stubborn, add a bit of more drops of water into the ink cartridge and try again, after blowing a few more times. Always remember to blow the gel pen over the sink or bathtub to contain any resulting ink drops mess.
Third Step: If everything fails, you can soak the entire gel pen in warm water for about 5 minutes. Alternatively, you can hold it over a steaming tea kettle for a couple of minutes and try again. Dry it thoroughly to prevent corrosion of the metal parts.
If you don’t want everything soaking in warm water, you can put the gel pen apart and soak the ink cartridge alone.
In the majority of cases, the hot water or the steam will melt any dried-out gel pen ink inside. A blow dryer or craft heat gun will also have the same results. But you will only need to heat the tip of the pen for just a few seconds using the craft heat gun or blow dryer.
Your gel pen should now write smoothly as before. Test the gel pen on different types of papers. you never know, a particular type of paper may be the unlocking key.
Final Step: It can sometimes seem a bit gross, but your spit can serve as a solvent to unblock the pen. Spit on a piece of cloth or fingertip and roll the tip of the gel pen on it. You can as well lick the pen and try writing on a piece of paper.
You don’t have to worry about getting sick from licking the pen. The ink is generally non-toxic, meaning that nothing will happen to you. The mildly toxic ingredients are present in very small amounts to cause any harm.
Rubbing alcohol is another solvent that can get things going. pour a bit in a cup and dip your gel pen. Try writing on a piece of paper and see if everything is now okay.
Even if it is more aggressive than alcohol, acetone can finally be the trick to unclogging your gel pen. Dip your pen in a bit of acetone, dry with a piece of cloth, and see if the problem goes away.
A word of Caution ✖
Of course! it’s very tempting to bang the pen on the scratch paper. resist the temptation at all costs as doing this can damage the tip of the pen, and the only solution is to throw it away.
Don’t use open flames to try and unblock the tip of the pen. you can burn the pen and destroy it, or even worse, leave yourself with a ghastly burn.
Avoid the industrial heat gun as it can completely obliterate your gel pen, and of course, that is not the idea. Please note that solvents such as acetone should be used in well-ventilated spaces. they produce noxious fumes.
Furthermore, acetone can be quite corrosive on the main types of plastic. if you choose to use it, only dip the tip of the gel pen, nothing else.
Other alternatives to acetone include odorless mineral spirits or kerosene. So, if you don’t have acetone near hands, you can try using them.
Related Content: How to Fix a Dry Highlighter Pen Work
Frequently Asked Questions
Q: How do you fix a dry gel pen tip?
If your gel pen has dried out, you can easily fix it by following some techniques mentioned below –
Priming the pen is the very first thing you can do. So, gently tap the pen nib against a piece of paper on a hard surface.
You can also shake pen vigorously if the ink level is low. It will help the ink to come close to the pen nib. Soaking the tip into warm water is another option you can try.
It helps to melt down any dried ink inside the ink cartridge and makes it easier to write. And finally, you can replace the ink refill if any option available!
Q: Why do gel pens dry out fast?
Some of the reasons why gel pens dry out faster are given below –
- Gel pens contain water-based ink that evaporates quickly compared to oil-based ink. So, if you keep the cap open for long time, it can cause the ink to dry out faster.
- Sometimes quality of the ink is also responsible for the gel pen ink to dry out. Low quality ink dries out quickly within the ink cartridge making the pen unable to work.
- Even if you store the pen in wrong way, the ink may dry out and clog the pen nib.
Q: How do you revive a dry Gelly Roll pen?
By going through this article, you may have got an idea on how you can revive gel pens. And Gelly Roll Pen is also a gel-based pen that can be revived easily.
So, for reviving a dry Gelly Roll pen, you can follow the above mentioned method as gel pen reviving methods are almost same. Hopefully, you will get your pen back as new as it was!
Q: Should you store gel pens up or down?
It is very much controversial as some recommends to store gel pens with the tip facing up to prevent ink settling or pooling in the tip. Again some recommends to store with the tip facing down to keep the ink flowing smoothly.
From my experience, I can say that keeping gel pens horizontally is the best way to store it and make it working for longer periods.
But if you prefer to keep the pens organized in a container then keep the tip side down and store it in an angle position. It will help to prevent ink from drying out.
Q: Do gel pens fade over time?
Gel pens can fade over time if it is exposed to the sunlight. Again the quality of the ink and the paper also affects how well the ink will hold up.
So, if you want to keep your gel pens writing free from fading, store it in a cool and dry place, away from sunlight. Some brands also claim their pens to be fade-proof or lightfast. You can also go for those brands, if you want prevent fading.
Final Thought
Prevention is always better than cure, and that also applies to gel pens. Stop the gel pens with the tip facing downwards and the cap on to prevent drying or formation of air bubbles.
But if the push comes to shove, and your gel pen finally stops working, try the above methods to fix a gel pen.
Update: October 2023 by @loardeva
Information Source: www.wikihow.com
Feature Image: craftingagreenworld.com