
Coloring with crayons is not just about the color strokes anymore. It is a diverse opportunity to show one’s creativity in a colorful and enchanting manner. From students to adults, all have been regular users of crayons in different stages of life.
Working with crayons became fluent as I took the work out of my passion. And as such, I went on to make various forms of work out of it. One is to make the perfect blend of it.
It is important. You can make it with many things, be it with alcohol, oil, or other stuff.
Be it a shade or exclusive tones, all became easier and more attractive as I got to make the perfect blending. So, the techniques and methods are important to know.
You must be pondering about it. Don’t anymore, because here you have a full detailed article on the easiest ways to blend crayons. Also, I’ll be answering several asked questions, along with a brief detail on the factors affecting the blending.
Important
Working with the crayon will be void if you don’t know about it. Especially, as you go on to make a mixture of the colors, you must know how they function and connect.
Crayons contain wax which can quickly melt with pressure or mild to high heating. Using this simple feature, you can build up your drawing strategies to showcase your skills, looking more professional and natural.
To take your crayon artwork to the next level, you have to know the blending methods. It is the proper way of mixing a single crayon’s shades, nature, and color with the others.
The main target is to get the desired result you want on the paper. And as such, the paper you are working on should also be able to cope with the jumble of colors. So, you must get the right paper for the proper purpose.
Paper Is Necessary for the Expected Result

There are a variety of papers in the market for coloring and drawing. Do all types of crayons give the same finishing result? Simply, no. If it can’t adjust with the crayons, the texture won’t give the desired outcome.
As crayon particles are thicker and meltable, you need a thick surface below them to roll perfectly. So, thick papers can be a good choice for blending crayons.
Also, they are less absorbent, which means they will soak less oil and rubbing alcohol. Thus, you can go on to make the blending of your own choice.
This is where thinner papers might not be the ideal choice for you. They will attract the oil particles and make the color spread quickly.
Commonly there are three types of paper- smooth, medium, and textured.
Textured paper is an ideal choice for you to get detailed drawings. Some of them are suitable for wax colors; some are not.
Medium papers are in between smooth and textured paper. It has more bumps and ridges on the paper.
So, it is suitable to draw with wax and oil paints. In the case of smooth paper, it has limitations to layering. As there’s not enough tooth to grip the wax, you might not get your desired flow of color on it.
The Best Ways to Blend Crayons
With the perfect paper on hold, you are just a step away from making the perfect blending with your colors. And that won’t be completed if you don’t do it in a consummate manner.
Here we go with the awaited steps on how you can blend crayons in the most straightforward ways possible.
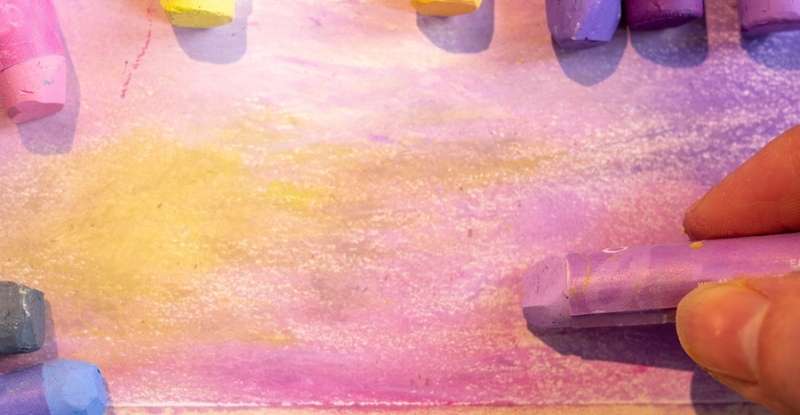
Method 1: Making Layers

An efficient way of bringing creativity to artwork is shade variation. And layering is an excellent method for it. Layering can be done using both similar or contrasting colors. Crayons are waxy, so they are easy to melt.
There are a few techniques that you can easily follow:
Technique 1: To bring a fading effect, start with a lighter color and follow with darker shades to specific areas or vice versa. As you keep adding newer shades, feather the edges.
Thus, it will come out looking more natural. Make sure there are no harsh lines between the shades.
Shades of similar colors such as blacks and grays can be used, or you can use contrasting colors, i.e., blue and yellow.
Technique 2: You can bring a combined effect with different colors using gaps. All you need to do is, lay down your first color leaving several gaps. Then fill those gaps with your second color and leave different gaps with the second color.
Repeat this process with the subsequent colors, and you will get an overall naturally blended effect. Don’t forget to feather the edges!
Technique 3: Variation in pressure on the crayons can bring darker and lighter impressions. If coloring is done by putting more pressure, the shade will be darker, and soft touch of color will lead to lighter shades. Thus, using this technique with the previous ones can create an excellent blended effect.
Method 2: Using Baby Oil
Are you familiar with using oil during blending colors? You have used water for painting with other coloring tools.
But surprisingly, baby oil has an unusual effect on crayons. Blending crayon colors with the help of standard household baby oil can give a fantastic result. It makes the color look more vibrant and lustrous.
You’ll need to follow a few easy steps to make it work.
Step 1: First, go for a patch test in a spare piece of similar paper that you will paint on. It is necessary to ensure there’s no unwanted reaction or effect of using that oil.
Step 2: Get a cotton or cotton bud and dab it in the baby oil. Once it has soaked the oil, remove the excess oil by lightly rubbing it on paper or clothes.
Step 3: For blending, use it across the crayon marks with moderate pressure and gently move it in a circular motion all over the colored area to get a smooth surface finish. Thus, you can bring out the vibrance of your desired colors.
Step 4: Another technique is by applying a thin layer of baby oil all over the plain paper you will paint on. The crayon wax will react with the oil and glide across the paper smoothly. So, the colors will be easy to blend and give a lustrous surface finish.
Method 3: Use Blow Dryer
One of the modern and amusing techniques of using crayons is melted crayon artwork. Crayons are easy to melt. So how about using a blow dryer?
Yes, you can use this handy tool to heat the crayons and quickly get visually pleasing artwork with fun in seconds.
The steps of applying this method are a little messy yet fun and easy. You won’t believe it until you see how it works.
Step 1: Get your crayons and put them in order of your preference such as; you can sequence them from the lightest to the darkest shade, or you can choose different shades of one color. The Rainbow color sequence is also a great option. It’s up to you.
Step 2: Attach the crayons in order at the top of your canvas using glue. You can unwrap the crayons or cut them in half to keep the canvas lined with crayons, giving it a more natural appearance.
Step 3: Take the canvas with crayons attached and lean it against a wall so the melted color quickly glides down across the canvas. You can use newspaper on the wall and under the canvas to avoid stains.
Step 4: Blow the crayons using a low to the optimum heat blow dryer. Use it downwards so that it drips down all over the canvas.
Step 5: Let the meat cool down and remove the crayons off the canvas. Thus, you got your masterpiece artwork.
Heating
Just a little bit of heat with crayons can change the blending game. The melting feature of wax is the key here.
It can be done either by heating the wax or heating the paper you will blend on. We will show you some of these uses.
Technique 1: Add colors on paper that you want to blend and heat the paper using a blow dryer. When warm enough, use your finger to smudge the color to bring a combined effect.
Technique 2: What if you don’t have a blow dryer? Smudge over the color with your fingertip with moderate pressure. The friction between your finger and the paper will heat the wax to melt, and you are good to go blending. Smudge until you get satisfied.
Technique 3: Heat the paper or canvas you’ll use for blending. Use a hairdryer to get the paper heated, and then lay down your desired colors, which now can be easily blended. Then let the paper cool down, and you have your masterpiece.
Method 4: Resort to Rubbing Alcohol
Not a familiar yet beneficial substance for blending is Rubbing alcohol. Rubbing alcohol reacts with the wax present in the crayons.
Its application for blending is similar to the baby oil one.
Step 1: Moisten cotton in the rubbing alcohol and remove the excess by dabbing it over a paper towel or fabric. It will prevent the dripping of different products.
Step 2: Then lay down your crayon marks and gently use that cotton over them in a circular motion. Blend it according to your desire and repeat the swabbing and blending process until satisfied.
Method 5: Craft Knife Technique
No doubt, a craft knife is essential for artists. A sharpener of colors, whether pencil or wax, a craft knife is widely used for paintings.
Let’s have a quick look at its uses for crayon colors.
- You can cut notches along the side of a crayon with the help of a craft knife. Then draw your artwork using that short side of the crayon.
- You can sharpen the top of your crayons when you need to draw detailing.
- Take two sheets of paper. Grate crayons with a craft knife. Mix the colors and put them between the sheets. Then rub a warm iron over the top of the sheets. You can also use a blow dryer.
Frequently Asked Questions (FAQs)
Q: How do you smooth crayons?
Smoothing up crayons is easier than you think. Let’s have a quick view of some of the ideas for doing it.
- Use rubbing alcohol or baby oil
- Scrap off the wax. Yes, just color with some extra pressure to get better pigmentation, scrape off the wax, and you are good to enjoy the incredibly smooth finish.
- You can use a damp brush to make the color slightly runny (For water-soluble crayons).
- Use a hairdryer to either heat up the paper or heat the color strokes and smudge to smoothen it.
- Use tissue paper or a finger to smudge and get a smooth finish.
Q: How do you blend crayons with water?
Water-soluble crayons are a versatile coloring medium. All it takes is a brush and a few drops of water. Interesting, right?
Damp the brush using clean water, remove excess water, so it doesn’t drip over the paper, smudge the brush to cover the colored area, and see the magic. Just the addition of a few ounces of water can make the crayons run smoothly for a long way.
Q: How do you blend crayons with tissue paper?
Along with baby oil and rubbing alcohol, bath tissue is an excellent blending tool too. Blending with tissue paper gives a velvety finish with a gradient effect.
All you need to do is follow these simple steps.
Step 1: Take a clean bath tissue and fold it in several layers.
Step 2: Lay down your color strokes on the paper and wipe the folded tissue across the strokes with mild pressure.
Step 3: Keep blending until you get a satisfying result.
Tips: Not just to blend, but you can also color with a bath tissue to transfer color to the drawing to bring a gradient finish.
Also, you can pick up colors from your drawing by using a bath tissue. Wipe the tissue over the color with heavy pressure and keep wiping in a circular motion to pick as much color as possible.
Q: How do you blend gel crayons?
Gel crayons are a class of crayons that can be used on various surfaces and are very easy to blend. It moves smoothly over the surface areas with a glossy finish.
Let us see how it is blended with a few easy steps.
- Get a damp brush, or you can use your finger to smudge the gel crayons as they can’t be used with a paper smudge.
- The colors must be kept clean and not muddy. Smudge each color at a time to get a better result.
- As gel crayons are pretty juicy and vibrant, a thin layer of standard color is enough to make them stand out.
Final Thoughts
Coloring has no boundary to any specific rules or regulations but is a form of expressing one’s imagination. But if the correct method is not being used, it may become difficult for you to bring out the best of your thoughts.
We believe you must know the easiest ways to blend a crayon. Even as a newbie in the field, your experience and dealing with color will improve significantly.
And that will indulge you more in arts and its great forms. Keep on combining the techniques to develop more out-of-the-box results. You might get a stylish way all by yourself.
Related Content: